Stay Charged: A Step-by-Step Guide on How to Check AirPod Battery in 2024
Introduction

Welcome to our comprehensive guide on how to check airpod battery life. As an AirPods user, you know how important it is to stay charged and ensure that your earbuds have enough power for your daily activities. In this guide, we will provide you with step-by-step instructions on how to check the battery levels of your AirPods using different devices, such as your iPhone, Mac, and Apple Watch.
Having the ability to monitor your AirPods’ battery life is crucial for uninterrupted usage. Imagine being in the middle of an important phone call or enjoying your favorite music, only to have your AirPods unexpectedly die out on you. By regularly checking your AirPods battery, you can avoid such inconvenient situations and ensure that you always have enough power to get through your day.
In this guide, we will walk you through different methods to check your AirPods battery, including using your iPhone settings, Mac settings, and Apple Watch settings. We will also provide you with additional tips and tricks on how to preserve your AirPods battery life and how to accurately monitor the battery percentage.
By the end of this guide, you will have a clear understanding of how to check your AirPods battery and manage your battery life effectively. So, let’s dive in and equip yourself with the knowledge to stay charged and enjoy uninterrupted usage of your AirPods!
A brief overview of the importance of checking AirPod battery status

Checking the battery status of your AirPods is crucial for a seamless and uninterrupted audio experience. As an AirPods user, you rely on these wireless earbuds to stay connected, whether it’s for taking important phone calls, listening to your favorite music, or watching videos. Therefore, it is essential to stay charged and manage your battery life effectively.
By regularly checking your AirPods battery, you can avoid the inconvenience of your earbuds dying out in the middle of an important conversation or during a crucial part of a song. Being aware of your battery levels allows you to plan ahead and ensure that you have enough power for your needs.
Additionally, monitoring your AirPods battery allows you to anticipate when they need to be charged. This is especially important when you’re on the go and don’t have immediate access to a charging port. By knowing the battery percentage, you can plan your usage accordingly and avoid running out of power when you need it the most.
Moreover, checking your AirPods battery status helps you identify any potential issues with the charging or connectivity. If you notice that the battery is draining quickly or that the connection is unstable, it may indicate a problem that needs to be addressed, such as a faulty charging case or a software glitch.
Overall, regularly checking your AirPods battery status is an essential practice to ensure a seamless and uninterrupted audio experience. It empowers you to stay charged, plan your usage effectively, and address any potential issues, allowing you to make the most out of your AirPods.
Why it is essential to stay charged and manage battery life

Staying charged and effectively managing the battery life of your AirPods is crucial for a seamless and uninterrupted audio experience. As an AirPods user, you rely on these wireless earbuds to stay connected and enjoy your favorite music, take important phone calls, or watch videos. Therefore, it is essential to prioritize and maintain a sufficient power level.
One of the primary benefits of staying charged is avoiding the inconvenience of your AirPods dying out in the middle of an important conversation or during a crucial part of a song. By regularly checking your AirPods’ battery status, you can plan ahead and ensure that you have enough power for your needs. This allows you to have uninterrupted audio enjoyment without interruptions.
Managing your AirPods’ battery life also helps you anticipate when they need to be charged. This is particularly important when you’re on the go and don’t have immediate access to a charging port. By knowing the battery percentage, you can plan your usage accordingly and avoid running out of power when you need it the most.
Moreover, checking your AirPods’ battery status allows you to identify any potential issues with the charging or connectivity. If you notice that the battery is draining quickly or that the connection is unstable, it may indicate a problem that needs to be addressed, such as a faulty charging case or a software glitch. By proactively addressing these issues, you can ensure that your AirPods function optimally and provide you with the best audio experience possible.
Overall, staying charged and effectively managing your AirPods’ battery life is essential for a seamless and uninterrupted audio experience. It empowers you to plan ahead, avoid unexpected interruptions, and address any potential issues promptly. By taking these steps, you can make the most out of your AirPods and enjoy a hassle-free listening experience.
Method 1: Checking Battery on iPhone

To check the battery status of your AirPods using your iPhone, follow these simple steps:
- Open the lid of your AirPods case with your AirPods inside.
- Hold the open case close to your iPhone.
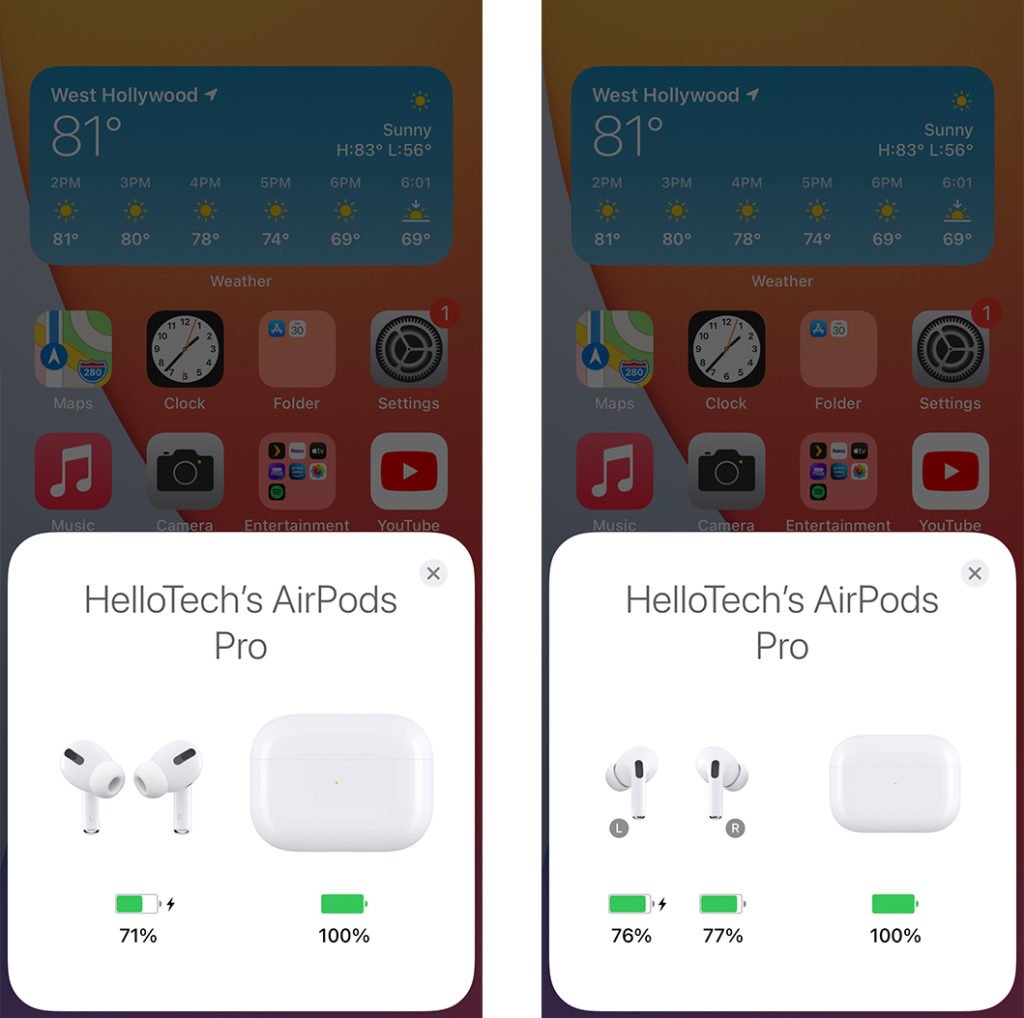
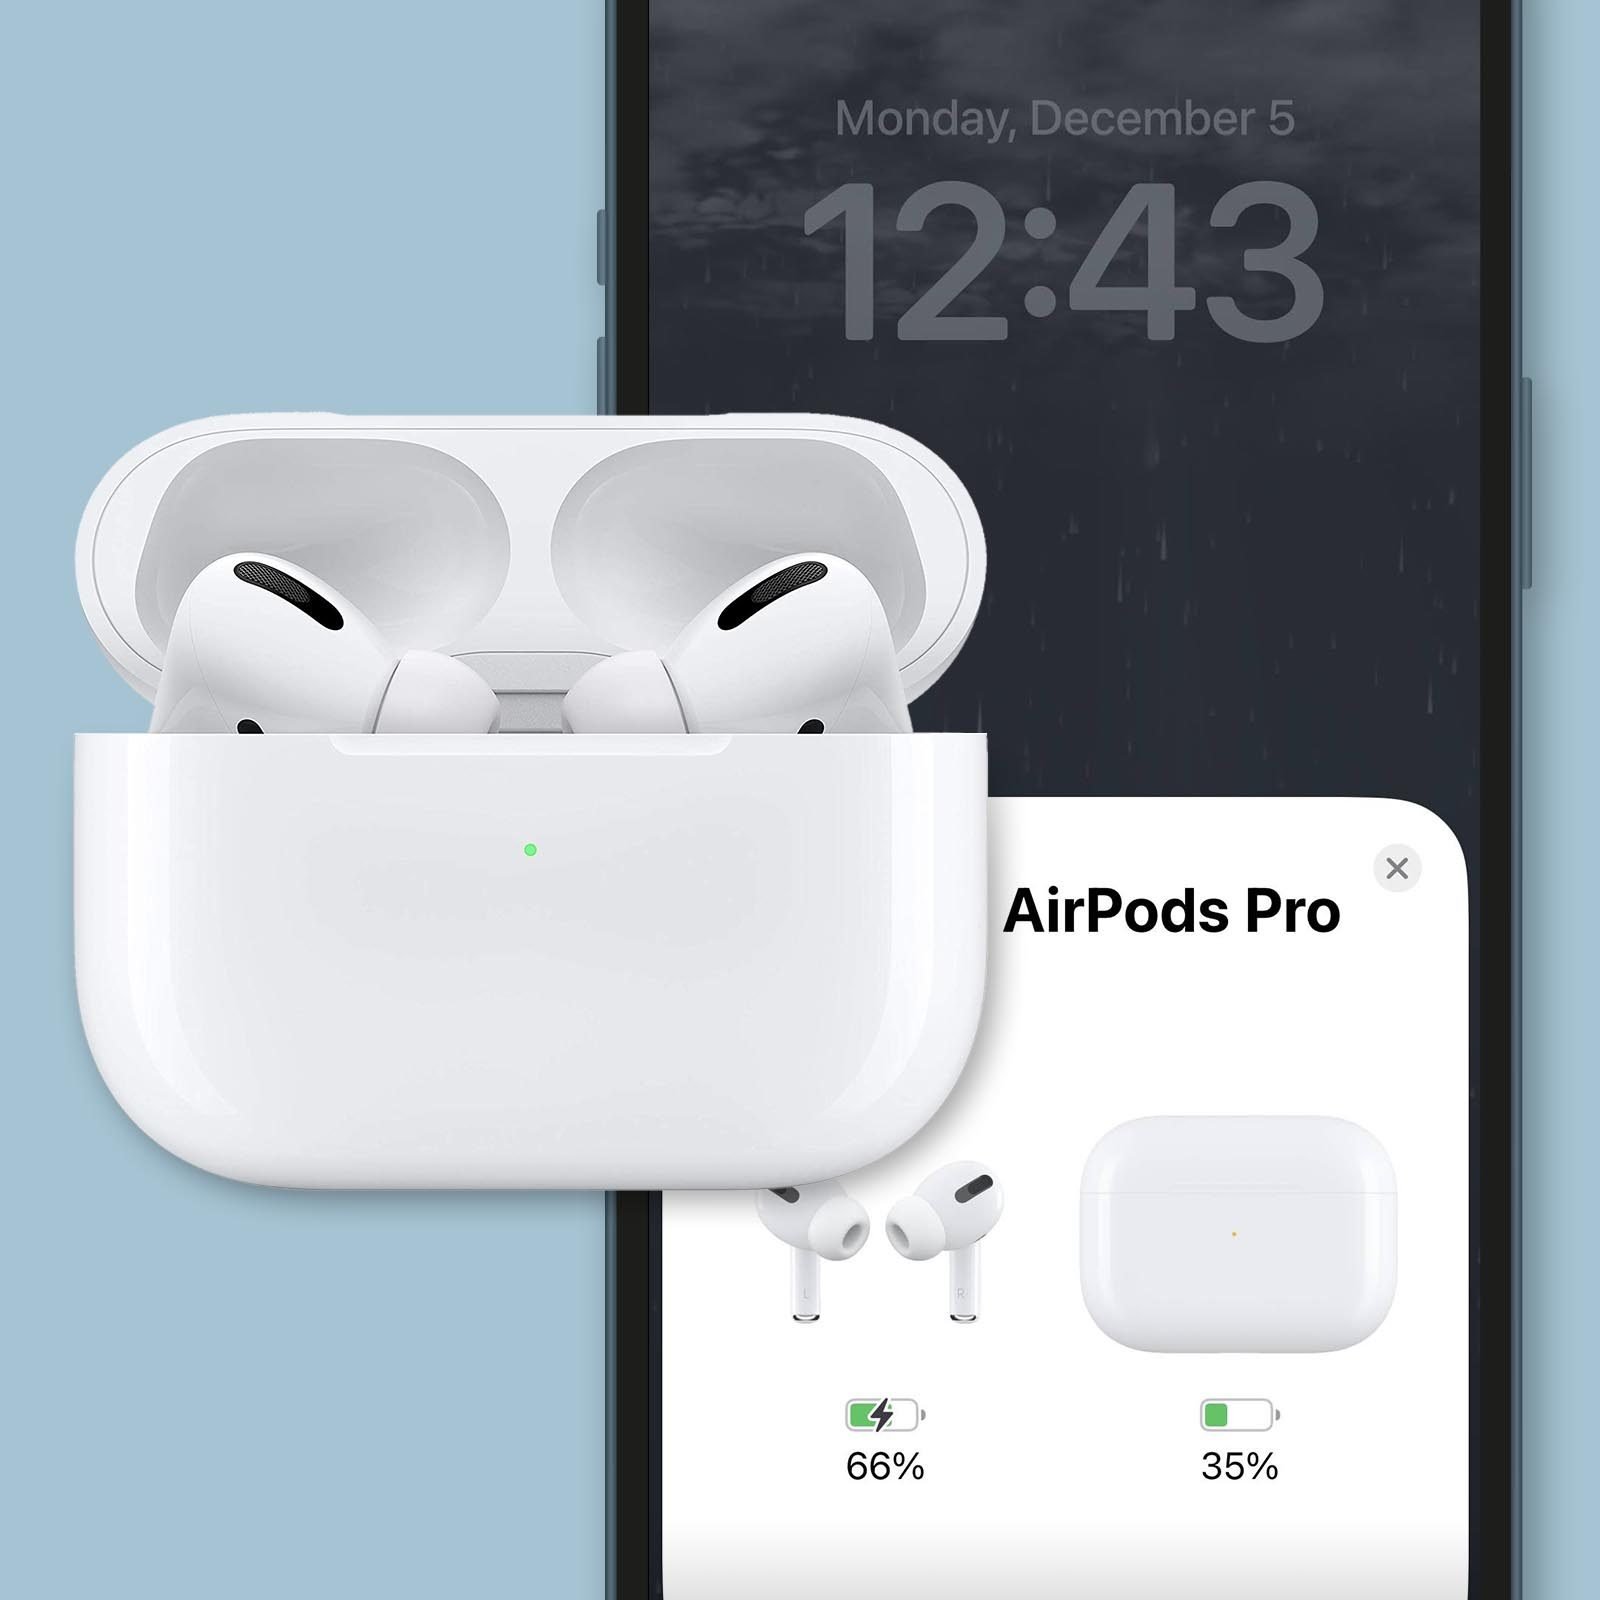
- Wait a few seconds for the battery status to appear on your iPhone’s screen. You will see the battery percentage for both your AirPods and the case itself. This gives you a clear indication of how much power is left in your AirPods.
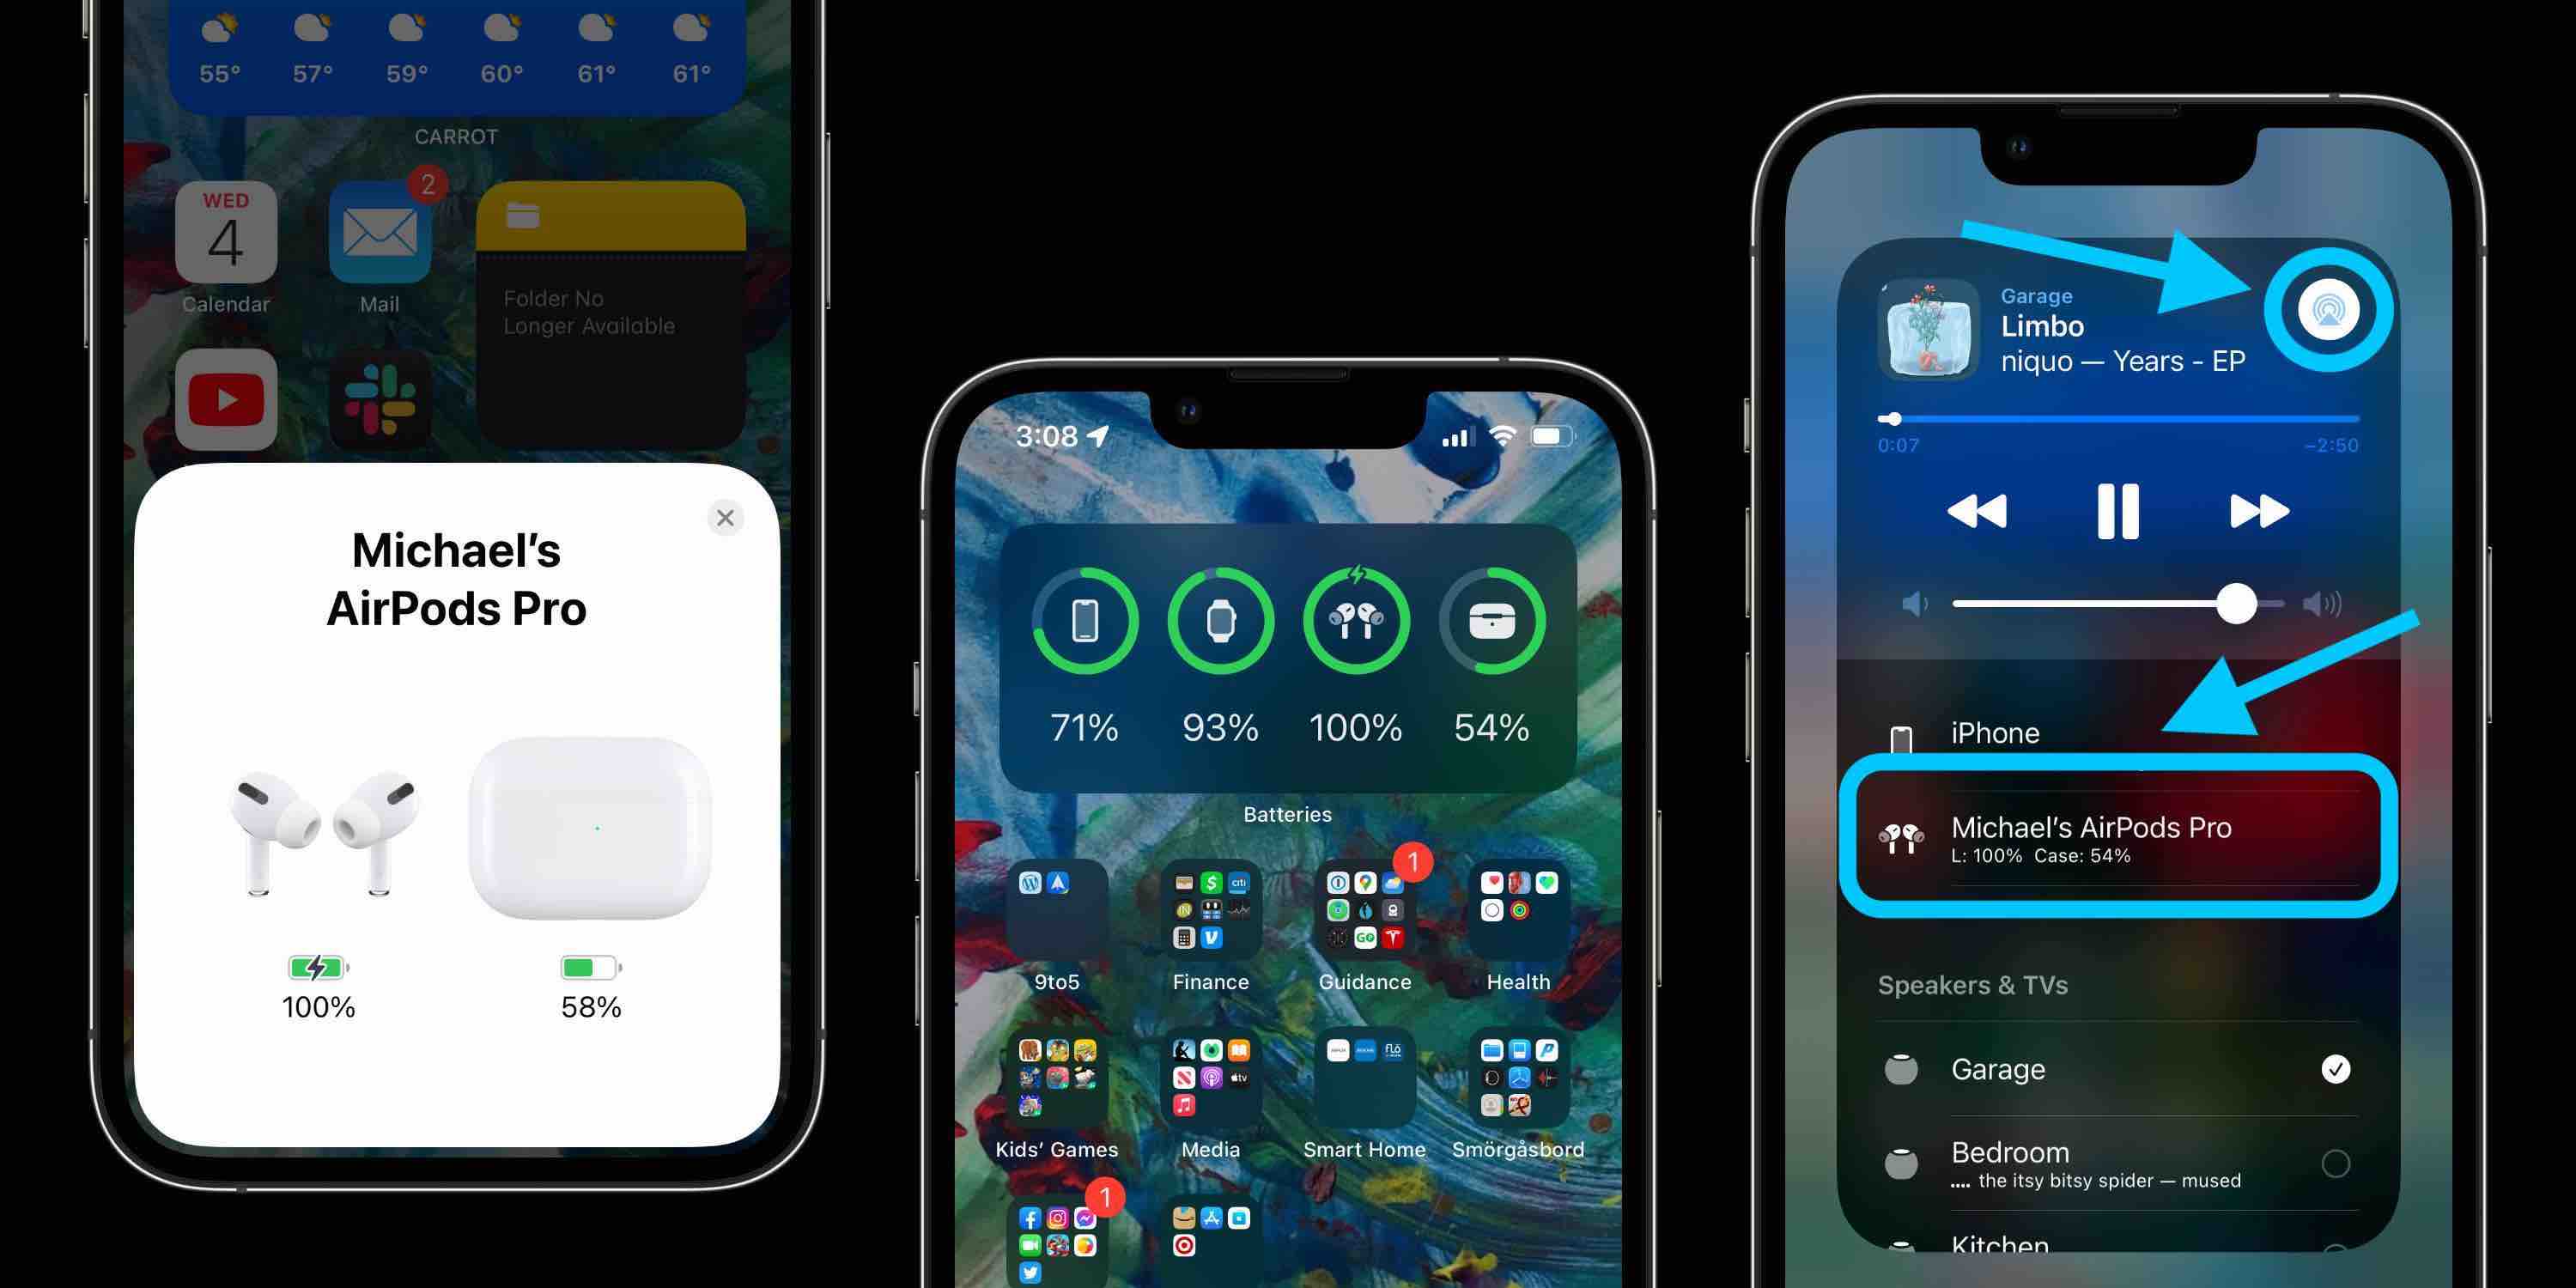
Alternatively, you can also use the Batteries widget on your iPhone to check the battery status of your AirPods. To do this, swipe right from the home screen or lock screen to access the Today View. Scroll down to the bottom and tap on “Edit.” Look for the Batteries widget and tap the green “+” button next to it. This will add the widget to your Today View.
Now, whenever you swipe right to access the Today View, you will see the battery percentage of your AirPods displayed in the Batteries widget.
By regularly checking the battery status of your AirPods on your iPhone, you can ensure that they are adequately charged for your needs. This allows you to plan ahead and avoid any unexpected interruptions due to low battery levels. Additionally, it is recommended to charge your AirPods regularly to maximize their battery life and overall performance.
Step-by-step guide on how to check AirPod battery through iPhone settings

- Open the lid of your AirPods case with your AirPods inside and make sure they are connected to your iPhone.
- On your iPhone, go to the home screen and open the Settings app.
- Scroll down and tap on “Bluetooth” to access your Bluetooth settings.
- Under the “My Devices” section, you should see your AirPods listed.
- Tap on the “i” icon next to your AirPods to open the device settings.
- On the AirPods settings page, you will find detailed information about your AirPods, including battery life.
- Look for the “Battery” section, where you will see the individual battery percentage for each AirPod and the charging case.
- The battery percentage will update and reflect the current charge level of your AirPods and the case.
- You can also enable the “Show in Notification Center” option to display the battery status of your AirPods in the Today View.
- By regularly checking the battery status of your AirPods through the iPhone settings, you can plan your usage accordingly and ensure that they are adequately charged for your needs.
Remember to charge your AirPods regularly to maximize their battery life and performance. With this simple guide, you can easily monitor your AirPods’ battery levels and avoid any unexpected interruptions due to low battery.
Alternative method to check battery through the Batteries widget

In addition to checking the battery status of your AirPods through the iPhone settings, you can also utilize the Batteries widget for a quick and convenient battery check. The Batteries widget provides a seamless way to keep an eye on your AirPods’ battery life without having to navigate through multiple settings menus. Here’s how to do it:
- Ensure that the Batteries widget is added to your Today View: Swipe right on your home screen or lock screen to access the Today View. Scroll to the bottom and tap “Edit” to customize your widgets. Look for the Batteries widget and tap the green “+” icon to add it.
- Check the battery status in the Batteries widget: Open your Today View by swiping right, and you will see the Batteries widget. If your AirPods are connected and their battery life is above 10%, you will see a battery percentage indicator next to the AirPods icon. If the battery level is below 10%, the icon will display a low battery warning.
- Tap the Batteries widget for more information: If you want more detailed information about the battery status of your AirPods, tap the Batteries widget. It will expand to show the individual battery percentage of each AirPod and the charging case.
By utilizing the Batteries widget, you can easily keep track of your AirPods’ battery life throughout the day. Remember to charge your AirPods regularly to ensure uninterrupted usage and optimal performance.
Method 2: Checking Battery on Mac

To check the battery status of your AirPods on a Mac, follow these simple steps:
- Click on the Bluetooth icon in your menu bar: Look for the Bluetooth icon in the top-right corner of your Mac’s screen. Click on it to open the Bluetooth menu.
- Locate your AirPods: If your AirPods are connected to your Mac, you will see them listed in the Bluetooth menu. They will be labeled as “AirPods” or “AirPods Pro.”
- Check the battery levels: Once you’ve located your AirPods in the Bluetooth menu, hover your cursor over them. A battery status popup will appear, showing you the battery levels of your AirPods as well as the battery level of your charging case.
- Monitor battery levels: You can monitor the battery levels of your AirPods and their charging case in real-time by keeping the Bluetooth menu open. The battery levels will update automatically, allowing you to see how much charge is remaining.
Alternatively, you can also use third-party tools like “Batteries” or “AirBuddy” to monitor and manage the battery levels of your AirPods and other Bluetooth devices. These apps provide more in-depth information and additional features to optimize battery usage.
By following these steps, you can easily check the battery status of your AirPods on your Mac. This will help you stay informed and ensure that you have enough battery life for your listening needs.
Step-by-step guide on how to check AirPod battery through Mac settings
To check the battery status of your AirPods through Mac settings, follow these steps:
- Click on the Bluetooth icon in the menu bar: Look for the Bluetooth icon in the top-right corner of your Mac’s screen. Click on it to open the Bluetooth menu.
- Find your AirPods: If your AirPods are connected to your Mac, you will see them listed in the Bluetooth menu. They will be labeled as “AirPods” or “AirPods Pro.”
- Check the battery levels: Once you’ve located your AirPods in the Bluetooth menu, hover your cursor over them. A battery status popup will appear, showing you the battery levels of your AirPods as well as the battery level of your charging case.
- Monitor battery levels: You can monitor the battery levels of your AirPods and their charging case in real-time by keeping the Bluetooth menu open. The battery levels will update automatically, allowing you to see how much charge is remaining.
By following these steps, you can easily check the battery status of your AirPods through Mac settings. This method gives you a convenient and quick way to monitor the battery levels without needing to open any additional apps or menus.
Remember to regularly check the battery status of your AirPods to ensure that you have enough charge for your listening needs. This will help you avoid any unexpected interruptions and allow you to plan your charging accordingly.
Utilizing the Bluetooth menu to monitor AirPod battery status

In addition to checking the battery status of your AirPods through the Mac settings, you can also utilize the Bluetooth menu to monitor their battery status in real-time. This provides you with a convenient and quick way to keep track of their charge level without having to open any additional apps or menus.
To utilize the Bluetooth menu to monitor your AirPods battery status, follow these steps:
- Click on the Bluetooth icon in the menu bar: Look for the Bluetooth icon in the top-right corner of your Mac’s screen. Click on it to open the Bluetooth menu.
- Find your AirPods: If your AirPods are connected to your Mac, you will see them listed in the Bluetooth menu. They will be labeled as “AirPods” or “AirPods Pro.”
- Check the battery levels: Once you’ve located your AirPods in the Bluetooth menu, hover your cursor over them. A battery status popup will appear, showing you the battery levels of your AirPods as well as the battery level of your charging case.
- Monitor battery levels: You can now monitor the battery levels of your AirPods and their charging case in real-time. Simply keep the Bluetooth menu open, and the battery levels will update automatically, allowing you to see how much charge is remaining.
By utilizing the Bluetooth menu, you can easily keep track of your AirPods’ battery levels, ensuring that you always have enough charge for your listening needs. This method offers a quick and efficient way to monitor battery status without the need for additional apps or settings.
Remember to regularly check the battery status of your AirPods to avoid any unexpected interruptions and to plan your charging accordingly. With the Bluetooth menu at your fingertips, you can stay charged and enjoy your AirPods uninterrupted.
Method 3: Checking Battery on Apple Watch

Checking the battery life of your AirPods using your Apple Watch is another convenient method. With just a few steps, you can quickly check the battery status and ensure that your AirPods are fully charged for your listening pleasure.
To check the battery status of your AirPods on your Apple Watch, follow these simple steps:
- Open the Settings app: On your Apple Watch’s home screen, locate and tap on the Settings app icon. This will open the settings menu.
- Select the Bluetooth option: Once in the settings menu, scroll down until you see the Bluetooth option and tap on it. This will take you to the Bluetooth settings.
- Find your AirPods: In the Bluetooth settings, look for the list of available devices. Locate your AirPods in the list and tap on them to access the device settings.
- Check the battery levels: Once you’re in the device settings for your AirPods, you will be able to see the battery levels for both your AirPods and the charging case. The battery status will be displayed as a percentage, allowing you to easily see how much charge is remaining.
In addition to using the settings app, you can also check the battery status of your AirPods through the Control Center on your Apple Watch. Simply swipe up on the watch face to access the Control Center and look for the battery icon. Tapping on the battery icon will show you the battery levels of your AirPods and their charging case.
By checking the battery status of your AirPods on your Apple Watch, you can stay informed about the charge levels and plan your listening sessions accordingly. This method offers a quick and hassle-free way to monitor the battery status of your AirPods, ensuring that you always have enough charge for a seamless audio experience.
Step-by-step guide on how to check AirPod battery through Apple Watch settings
To check the battery status of your AirPods on your Apple Watch, follow these simple steps:
- Open the Settings app: On your Apple Watch’s home screen, locate and tap on the Settings app icon. This will open the settings menu.
- Select the Bluetooth option: Once in the settings menu, scroll down until you see the Bluetooth option and tap on it. This will take you to the Bluetooth settings.
- Find your AirPods: In the Bluetooth settings, look for the list of available devices. Locate your AirPods in the list and tap on them to access the device settings.
- Check the battery levels: Once you’re in the device settings for your AirPods, you will be able to see the battery levels for both your AirPods and the charging case. The battery status will be displayed as a percentage, allowing you to easily see how much charge is remaining.
In addition to using the settings app, you can also check the battery status of your AirPods through the Control Center on your Apple Watch. Simply swipe up on the watch face to access the Control Center and look for the battery icon. Tapping on the battery icon will show you the battery levels of your AirPods and their charging case.
This method offers a quick and hassle-free way to monitor the battery status of your AirPods, ensuring that you always have enough charge for a seamless audio experience. By checking the battery status of your AirPods on your Apple Watch, you can stay informed about the charge levels and plan your listening sessions accordingly.
Using the Control Center for a quick battery check on your wrist

The Control Center on your Apple Watch provides a convenient way to check the battery status of your AirPods without having to navigate through menus. Here’s how you can quickly monitor your AirPods battery using the Control Center:
- Raise your wrist: Lift your wrist to activate your Apple Watch’s display. You can also tap on the screen or press the Digital Crown to wake up the device.
- Access the Control Center: Swipe up from the bottom of the watch face to open the Control Center. This is where you can access various functions and settings.
- Find the battery icon: Look for the battery icon, which resembles a lightning bolt. It should be located near the top-right corner of the Control Center.
- Tap on the battery icon: Once you’ve located the battery icon, tap on it to reveal the battery levels of your AirPods and their charging case. The battery status will be displayed as a percentage, allowing you to quickly assess how much charge is remaining.
By using the Control Center, you can easily keep an eye on the battery levels of your AirPods directly from your wrist. This is especially useful when you’re on the go and don’t have immediate access to your iPhone or Mac. Monitoring your AirPods’ battery status in real-time allows you to plan your usage accordingly and ensure that you always have enough charge for your listening needs.
Remember, regularly checking the battery status of your AirPods can help you avoid unexpected interruptions and ensure a seamless audio experience. Keeping your AirPods adequately charged is essential for enjoying your favorite music, podcasts, and phone calls without any disruptions.
Additional Tips and Tricks

To make the most out of your AirPods and ensure optimal battery life, here are some additional tips and tricks to keep in mind:
- Preserve battery life with smart charging: Avoid leaving your AirPods continuously charging for extended periods. It’s best to charge them when the battery level is low or before a long period of use. Overcharging can affect battery longevity.
- Use one AirPod at a time: If you’re not using both AirPods for a stereo experience, consider using just one at a time. This not only extends the battery life of the AirPods in use but also allows you to switch to the fully charged AirPod when one runs out of battery.
- Disable Automatic Ear Detection: By turning off the Automatic Ear Detection feature, you can save some battery life. With this feature disabled, your AirPods won’t automatically pause audio playback when you remove them from your ears.
- Enable Low Power Mode: If you find that your AirPods are running out of battery quickly, you can enable Low Power Mode to reduce power consumption. This mode reduces the sound quality slightly but extends the battery life. To enable it, go to Settings > Bluetooth > AirPods > Low Power Mode.
- Check for firmware updates: Regularly update your AirPods firmware to enhance performance and improve battery efficiency. You can check for updates by connecting your AirPods to your iPhone and going to Settings > General > About > AirPods.
- Keep the AirPods clean: Keep your AirPods free from dirt and debris by regularly cleaning them. This prevents any blockage in the charging ports and maintains a good connection, allowing for efficient charging and prolonging battery life.
By following these additional tips and tricks, you can maximize the battery life of your AirPods and enjoy uninterrupted listening experiences whenever you need them.
Best practices for preserving AirPod battery life
:max_bytes(150000):strip_icc()/airpods-battery-popup-0cbd79ef924246adb6725ae9abc6f518.jpg)
To ensure optimal battery life and performance from your AirPods, it is important to follow these best practices:
- Avoid extreme temperatures : Exposure to excessive cold or heat can negatively impact the battery life of your AirPods. Keep them in a temperature-controlled environment when not in use.
- Use the appropriate charging method : Always use the charging case that comes with your AirPods for charging. Avoid third-party chargers, as they may not provide the optimal charge required by the AirPods.
- Unplug when fully charged : Once your AirPods are fully charged, unplug them from the charger. Continuous charging beyond the required level can shorten the battery lifespan.
- Keep software up to date : Regularly update your AirPods firmware to benefit from any software improvements that can enhance battery efficiency.
- Disable unnecessary features : Turn off features that are not in use, such as Automatic Ear Detection or the noise cancellation feature (if applicable). This can help conserve battery life.
- Use a low power mode : If you find your AirPods’ battery draining quickly, consider enabling Low Power Mode. This mode reduces certain features slightly to extend battery life.
- Store properly when not in use : When you’re not using your AirPods, store them in their case. This protects them from damage and ensures they are not accidentally left on, draining the battery.
By following these best practices, you can maximize the battery life of your AirPods and enjoy longer listening sessions without interruptions.
Showing battery status as a percentage for accurate monitoring

To ensure accurate monitoring of your AirPods battery life, it is recommended to enable the option to display the battery status as a percentage. By doing so, you can have a more precise understanding of the remaining charge and plan accordingly.
To enable the percentage display, follow these steps on your iPhone or iPad:
- Open the Settings app and tap on “Bluetooth”.
- Find your AirPods in the list of connected devices and tap the “i” icon next to them.
- Toggle on the “Show Percentage” option.
Once enabled, the battery percentage will be visible next to the AirPods icon in the status bar or in the Batteries widget on the home screen. This feature allows you to track the battery life more accurately, especially when you need to plan your usage or charge the AirPods before a long journey or important event.
Having the battery status displayed as a percentage helps you avoid unexpected battery depletion and ensures that you have enough charge remaining for your desired listening session or call. It also avoids any sudden interruptions during your favorite podcast, workout, or phone conversation.
By incorporating this simple habit of showing the battery status as a percentage, you can proactively manage your AirPods battery life and enjoy a worry-free experience, knowing exactly when it’s time to recharge.
Conclusion

In conclusion, regularly checking the battery status of your AirPods is crucial for a seamless and uninterrupted listening experience. By knowing how much charge is left in your AirPods, you can plan your usage accordingly and avoid any unexpected interruptions.
Throughout this guide, we have provided step-by-step instructions on how to check your AirPods battery on different devices such as iPhone, Mac, and Apple Watch. Whether it’s through the settings menu or the Batteries widget, these methods allow you to easily monitor the battery life of your AirPods.
We have also discussed additional tips and tricks for preserving AirPods battery life, such as keeping them in the case when not in use, avoiding extreme temperatures, and updating to the latest firmware. By following these best practices, you can extend the longevity of your AirPods battery and ensure optimal performance.
Furthermore, we emphasized the importance of showing the battery status as a percentage for accurate monitoring. Enabling this feature provides a more precise understanding of the remaining charge and helps you plan your usage or charge the AirPods before important events.
By incorporating these practices into your routine, you can enjoy a worry-free experience with your AirPods, knowing exactly when it’s time to recharge. Remember, a little proactive battery management goes a long way in ensuring an uninterrupted listening experience and maximizing the lifespan of your AirPods.
So, stay charged and enjoy your favorite music, podcasts, and phone calls with confidence, knowing that your AirPods are ready to deliver.
Recap of the different methods to check AirPod battery and their benefits

In this article, we have outlined several methods to check the battery life of your AirPods and discussed their benefits. Let’s recap these methods and their advantages:
- Checking Battery on iPhone: This method allows you to easily monitor the battery status of your AirPods directly from your iPhone settings. By navigating to the Bluetooth menu, you can see the battery percentage of your AirPods and their charging case. This helps you plan your usage and ensure you have enough battery for your listening needs.
- Checking Battery on Mac: If you prefer to check the battery status of your AirPods on your Mac, you can do so through the Bluetooth settings. By clicking on the Bluetooth menu in the menu bar and selecting your AirPods, you can view their battery percentage. This method is convenient for users who frequently use their AirPods while working on their Mac.
- Checking Battery on Apple Watch: If you own an Apple Watch, you can easily check the battery level of your AirPods right from your wrist. By accessing the settings on your Apple Watch, you can see the battery life of your AirPods and their charging case. This is useful when you’re on the go and need to quickly check if your AirPods need charging.
Each of these methods provides a simple and straightforward way to monitor the battery life of your AirPods. By knowing the remaining charge, you can better manage your usage and avoid unexpected interruptions. Whether you prefer to check on your iPhone, Mac, or Apple Watch, these methods ensure that you stay charged and enjoy a seamless listening experience with your AirPods.
Emphasizing the importance of regular battery checks for uninterrupted usage.
Regular battery checks for your AirPods are essential to ensure uninterrupted usage and to make the most out of your listening experience. By regularly checking the battery status, you can plan and manage your usage accordingly, avoiding unexpected interruptions or running out of battery at inconvenient times. Here’s why regular battery checks are important:
- Seamless Listening Experience: Knowing the battery level of your AirPods allows you to plan your listening sessions without any interruptions. By checking the battery status before starting your day or a long journey, you can ensure that you have enough battery to enjoy your favorite music, podcasts, or calls without any sudden interruptions.
- Avoiding Battery Drain: Regular battery checks help you identify any battery-draining apps or features that may be impacting the battery life of your AirPods. By keeping track of the battery usage, you can make adjustments to ensure optimal battery performance and maximize the lifespan of your AirPods.
- Optimum Charging Routine: Monitoring the battery status of your AirPods enables you to establish a routine charging schedule. By being aware of how much battery is remaining, you can plan your charging sessions accordingly and avoid leaving your AirPods completely drained or overcharging them, both of which can potentially impact the overall battery life.
- Taking Advantage of Battery-saving Features: Some devices and platforms provide battery-saving features that can extend the battery life of your AirPods. By regularly checking the battery status, you can take advantage of these features and adjust settings on your iPhone, Mac, or Apple Watch to optimize battery usage and enhance longevity.
Remember, regular battery checks are essential for maintaining the performance and longevity of your AirPods. By staying on top of the battery levels, you can enjoy uninterrupted usage and get the most out of your wireless listening experience.

