Step-by-Step Guide: Recording Your Screen on Windows 10
Introduction
Welcome to our step-by-step guide on how to record your screen on Windows 10. Screen recording has become increasingly popular as it allows individuals and businesses to create engaging tutorials, presentations, and demonstrations. Whether you want to record a video game session, create software tutorials, or capture a video call, screen recording can be a valuable tool in your arsenal.
Windows 10 offers its own built-in screen recording feature called Game Bar, making it convenient and accessible for users. With the Game Bar, you can easily record your screen and audio, making it ideal for various purposes. This feature is available in both Windows 10 and 11.
Recording your screen offers numerous benefits. It allows you to share knowledge and information in a visual format, making it easier for viewers to understand. Screen recordings can also serve as a reference or documentation for troubleshooting technical issues or demonstrating specific tasks.
In this guide, we will walk you through the entire process of recording your screen on Windows 10. We will cover everything from checking system requirements, selecting the right screen recording software, adjusting settings, choosing the recording area, initiating the recording process, pausing and stopping the recording, editing the recording, and finally, saving and exporting the finished product.
By the end of this guide, you will have the knowledge and skills to confidently record your screen on Windows 10 and turn your recordings into professional videos. Let’s get started!
Overview of screen recording on Windows 10

Screen recording on Windows 10 is a valuable feature that allows you to capture and record everything happening on your computer screen. Whether you need to create tutorials, record gameplay, or share presentations, screen recording can help you effectively communicate your message. With Windows 10’s built-in Game Bar feature, screen recording has become more accessible and convenient for users.
The Game Bar is a powerful tool that enables you to record not only your screen but also audio and even your webcam. It provides a user-friendly interface with various customization options, making it suitable for both beginners and professionals. Whether you want to record the entire screen or just a specific window or application, the Game Bar has you covered.
One of the key advantages of screen recording on Windows 10 is the ability to capture high-quality video and audio. You can record at full HD or even 4K resolution, ensuring that your recordings are crisp and clear. This is especially important for tutorial videos or presentations where visual clarity is crucial.
Furthermore, screen recording on Windows 10 allows for seamless editing and customization. You can trim, crop, and add annotations to your recordings to enhance their visual appeal and convey your message effectively. Whether you need to highlight specific areas, draw attention to important details, or add captions, Windows 10’s built-in tools make editing a breeze.
In conclusion, screen recording on Windows 10 offers a versatile solution for capturing, sharing, and editing your screen activities. With the Game Bar feature, you have all the tools you need to create professional-quality videos. Whether you’re a student, professional, or content creator, screen recording on Windows 10 can elevate your presentations and tutorials to the next level.
Importance of recording your screen
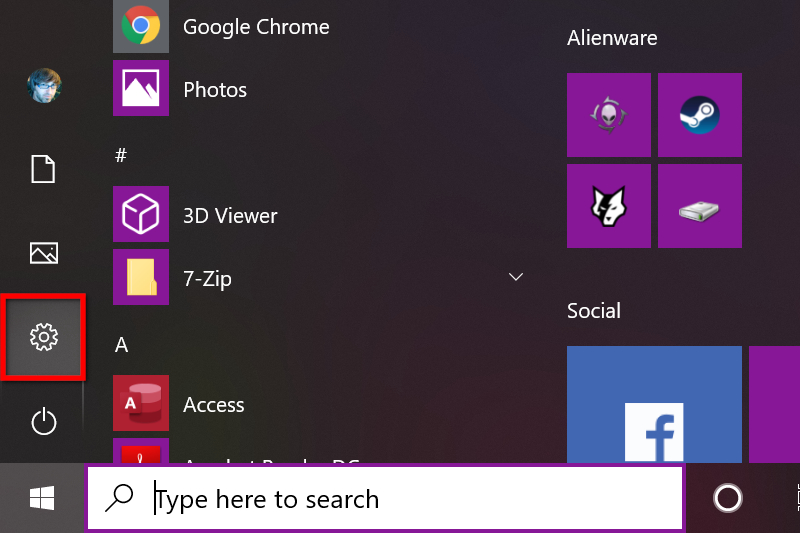
Recording your screen on Windows 10 is an important tool that can benefit various individuals and industries. Whether you’re a student, professional, or content creator, screen recording offers a wide range of advantages that can enhance your productivity and communication.
One of the main benefits of recording your screen is the ability to create tutorials and instructional videos. Whether you’re teaching a new software, demonstrating a process, or sharing a step-by-step guide, screen recording allows you to visually showcase the information. This can be especially helpful for online learning, remote collaboration, or training purposes, as it provides a clear and engaging way for viewers to follow along.
Additionally, screen recording can be valuable for content creators and marketers. Whether you’re creating video content for social media, YouTube, or your website, screen recording enables you to capture gameplay, software demonstrations, or presentations. It allows you to showcase your expertise, engage your audience, and share valuable information in an easily digestible format.
Furthermore, screen recording can be beneficial for troubleshooting and technical support. If you’re encountering an issue on your computer, capturing a screen recording can help you explain the problem effectively to IT support or share it with online communities. This saves time and simplifies the process of finding a solution.
Lastly, screen recording can serve as documentation and evidence. Whether you’re recording a webinar, conference, or online meeting, capturing the screen allows you to preserve the content for future reference. It can also be used as evidence in legal or professional settings when needed.
In conclusion, recording your screen on Windows 10 provides numerous benefits across various domains. It enhances communication, facilitates learning, supports marketing efforts, and simplifies troubleshooting. By leveraging screen recording, you can effectively convey information, engage your audience, and improve productivity.
Preparing for Screen Recording

Before you begin recording your screen on Windows 10, it is important to make some preparations to ensure a smooth and successful recording process. By taking the time to check system requirements and select the right screen recording software, you can optimize your recording experience.
Firstly, it is essential to check if your computer meets the system requirements for screen recording. Make sure your device has enough storage space, memory, and processing power to handle the recording. This will ensure that your recordings are high quality and free from any glitches or lag.
Once you have confirmed that your system is ready for screen recording, the next step is to select the appropriate screen recording software. There are several options available, including built-in tools like the Xbox Game Bar or third-party software like OBS Studio or Camtasia. Consider your specific needs and preferences, such as the level of customization and editing capabilities, as well as user-friendliness, when choosing the software.
After selecting the software, make sure to install and set it up according to the instructions provided. Familiarize yourself with the interface and options available, as this will help you navigate and utilize the features effectively during the recording process.
Additionally, ensure that your audio inputs, such as microphone and system audio, are configured correctly. Test the audio levels to ensure optimal sound quality in your recordings.
By preparing your system and selecting the appropriate software, you can ensure a smooth and hassle-free screen recording experience on Windows 10. Taking these steps will help you capture your screen accurately and produce high-quality recordings that meet your specific needs.
Checking system requirements

Before you begin recording your screen on a Windows 10 PC, it is crucial to check if your computer meets the necessary system requirements. Ensuring that your device has sufficient storage space, memory, and processing power is essential for a smooth and high-quality recording experience.
Firstly, check the storage space available on your computer. Screen recordings tend to take up a significant amount of space, especially if you plan on recording long videos or capturing high-resolution content. Make sure you have enough free space on your hard drive to accommodate the recordings without running into storage issues.
Next, consider the memory or RAM of your computer. A higher amount of RAM allows your device to handle multiple tasks simultaneously, preventing any lag or slowdown during the recording process. It is recommended to have at least 8GB of RAM for smooth screen recording.
Additionally, check the processing power of your computer. The processor plays a crucial role in handling the screen recording software and ensuring smooth performance. Make sure your processor meets the minimum requirements specified by the recording software you plan to use.
It is also important to ensure that your computer’s graphics card supports screen recording. Some advanced recording software may require a dedicated graphics card to handle high-quality recordings and real-time encoding.
By confirming that your computer meets these system requirements, you can ensure optimal performance and quality when recording your screen on Windows 10. This step is crucial for avoiding any glitches, lag, or compromised audio-visual output.
Selecting a screen recording software
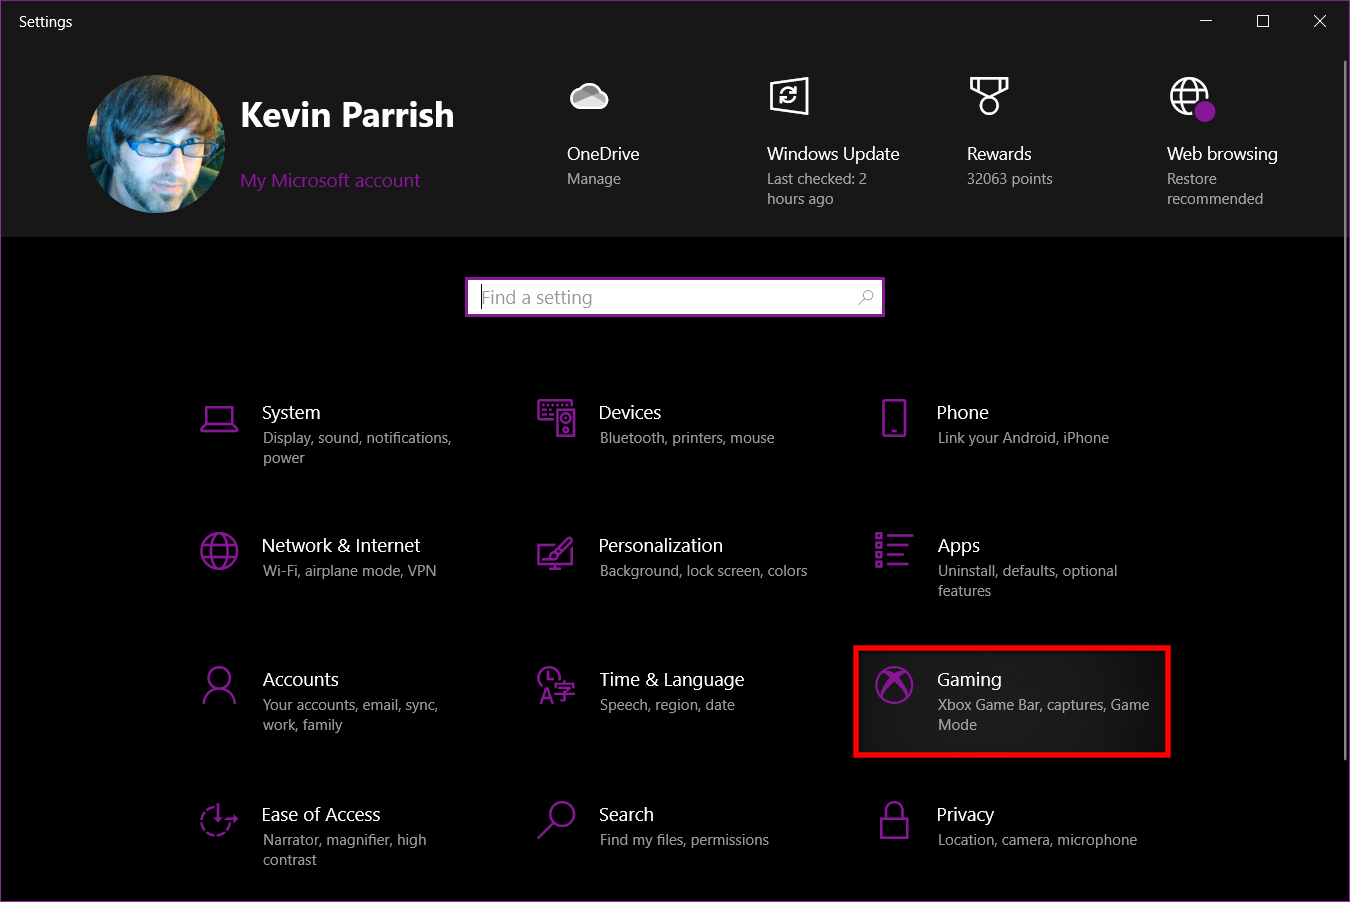
When it comes to selecting a screen recording software for your Windows 10 PC, there are several options available to choose from. Finding the right software that meets your specific needs and preferences is crucial for a smooth and efficient recording experience. Here are some factors to consider when selecting a screen recording software:
- Features and functionality: Look for software that offers a wide range of features, such as the ability to capture your entire screen or specific regions, record audio along with the screen, and easily edit and save your recordings. Consider what features are essential for your recording needs and find software that provides those capabilities.
- Ease of use: Opt for a user-friendly software that is intuitive and easy to navigate. You want a program that allows you to quickly start and stop recordings, adjust settings, and access editing tools without any hassle.
- Quality and performance: Look for software that provides high-quality recordings with clear visuals and crisp audio. Consider the program’s performance in terms of speed, stability, and resource usage to ensure it won’t slow down your computer or cause any glitches during recording.
- Compatibility: Make sure the software is compatible with your Windows 10 operating system. Check for any system requirements or limitations before making your decision.
- Customer reviews and reputation: Read reviews from other users to get an idea of the software’s reliability, customer support, and overall user experience. Look for reputable software providers that have a track record of delivering quality products and services.
By carefully considering these factors, you can select a screen recording software that best suits your needs and ensures a smooth and successful recording process on your Windows 10 PC.
Setting Up Your Recording

Now that you have prepared your system and selected a screen recording software, it’s time to set up your recording. Follow these steps to ensure a smooth recording process on your Windows 10 PC:
- Adjusting recording settings: Before you begin recording, take a moment to adjust the recording settings according to your preferences. Most screen recording software allows you to choose the video format, frame rate, and quality settings. It’s recommended to select a higher video resolution and frame rate for better clarity, but keep in mind that higher settings may require more processing power and storage space.
- Choosing the area to record: Decide whether you want to capture your entire screen or just a specific region. Most recording software offers options to select a specific window, a defined area, or the entire screen. Consider the purpose of your recording and choose the appropriate option. If you are planning to record a tutorial or demonstration, it’s often helpful to focus on a specific area of your screen to provide a clear view for viewers.
- Configuring audio settings: Check the audio settings of your screen recording software and ensure that the correct audio source is selected. You can choose to record system audio, microphone input, or both. If you are recording a presentation or narrating your screen, make sure to enable the microphone input option.
By taking the time to properly set up your recording, you can ensure that you capture exactly what you need without any technical issues or interruptions. Adjust the recording settings, choose the appropriate area to record, and configure the audio settings according to your preferences. This will result in a high-quality screen recording that meets your specific requirements.
Adjusting recording settings
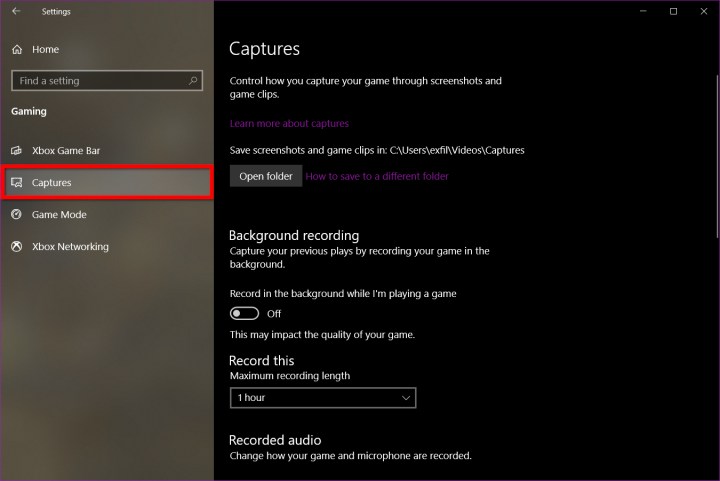
When it comes to recording your screen on Windows 10, it’s important to take the time to adjust the recording settings according to your preferences. By doing so, you can ensure that you capture the highest quality video with optimal clarity. Most screen recording software offers a range of settings that you can customize to meet your specific needs. Here are some key aspects to consider when adjusting the recording settings:
- Video format: Choose the video format that best suits your requirements. The most common formats include MP4, AVI, and WMV. Consider factors such as video quality, compatibility with different devices, and file size when making your selection.
- Frame rate: The frame rate determines how many frames are captured per second. Higher frame rates, such as 30 or 60 frames per second, provide smoother and more realistic video playback. However, keep in mind that higher frame rates require more processing power and may result in larger file sizes.
- Quality settings: Adjust the video quality settings to strike a balance between file size and clarity. Higher quality settings provide sharper images but also result in larger file sizes. Consider the purpose of your recording to determine the appropriate quality level.
- Hotkeys: Some screen recording software allows you to set hotkeys for convenient control during the recording process. This can include shortcuts for starting, pausing, or stopping the recording, as well as adjusting audio settings. Customizing hotkeys can streamline your workflow and make the recording process more efficient.
By taking the time to adjust the recording settings, you can ensure that your screen recording meets your specific requirements. Consider factors such as video format, frame rate, quality settings, and hotkeys to achieve the best possible outcome for your recording. Experiment with different settings to find the optimal configuration for your needs.
Choosing the area to record

When recording your screen on Windows 10, it’s important to choose the specific area of your screen that you want to capture. This allows you to focus on the relevant content and avoid capturing any unnecessary elements. Here are some tips for choosing the area to record:
- Determine your recording purpose: Before selecting the area to record, consider the purpose of your screen recording. Are you creating a tutorial video that requires capturing the entire screen, or do you only need to focus on a specific application or webpage? This will help you determine the appropriate area to record.
- Use a screen recording software with area selection: Many screen recording software options allow you to select a specific area of your screen to record. This can be done by adjusting the recording settings or using a built-in selection tool. Look for software that offers this feature to have more control over what is captured.
- Resize and reposition windows: If your screen recording software does not have built-in area selection, you can manually resize and reposition windows to frame the desired area. This can be done by dragging the edges of the windows or using the window’s maximize/minimize buttons.
- Consider aspect ratio: Depending on the purpose of your screen recording, you may need to consider the aspect ratio of the recording area. Common aspect ratios include 16:9 and 4:3. Ensure that the selected area maintains the desired aspect ratio for optimal viewing.
By carefully choosing the area to record, you can ensure that your screen recording captures the necessary content without any distractions. Take the time to determine your recording purpose, use screen recording software with area selection features, resize and reposition windows if needed, and consider the aspect ratio for the best results.
Recording Your Screen

Once you have set up your recording settings and chosen the area to record, it’s time to start the screen recording process. Follow these steps to record your screen on Windows 10:
- Initiating the screen recording process: To begin recording, open the application or webpage that you want to capture. Then, press the Windows key + G on your keyboard. This will open the Game Bar overlay. If prompted, confirm that the application you’re using is a game.
- Starting the recording: In the Game Bar overlay, click on the red Record button or press the Windows key + Alt + R. A timer will appear to indicate that the recording has started. You can minimize the Game Bar overlay and continue with your screen activities.
- Pausing and stopping the recording: If you need to pause the recording temporarily, press the Windows key + Alt + R again. To stop the recording, click on the small red recording indicator in the top-right corner of your screen, or press the Windows key + Alt + R once more. The recording will automatically be saved as a video file in the designated folder.
While recording, you can also use the Game Bar overlay to take screenshots, enable or disable the microphone, and adjust recording settings.
Remember to stay organized and focused while recording your screen. Minimize distractions and ensure that you are capturing the desired content with clarity. Once you have finished recording, you can proceed to edit and save your recording using video editing software or the built-in editing features in your screen recording software.
With these steps, you can effectively record your screen on Windows 10 and share your tutorials, gameplay, or presentations with others.
Initiating the screen recording process

To begin recording your screen on Windows 10, you need to initiate the screen recording process. Follow these steps:
- Open the application or webpage that you want to capture. Whether it’s a tutorial, gameplay, or presentation, make sure it is displayed on your screen.
- Press the Windows key + G on your keyboard. This will open the Game Bar overlay, which is a built-in feature specifically designed for screen recording on Windows 10. If prompted, confirm that the application you’re using is a game. Don’t worry, even if it’s not a game, this step is necessary to access the screen recording functionality.
- In the Game Bar overlay, you will see a red Record button. Click on this button to start the recording. Alternatively, you can press the Windows key + Alt + R to initiate the recording.
- Once the recording starts, a timer will appear to indicate that the screen recording is in progress. You can minimize the Game Bar overlay and continue with your screen activities.
During the recording, you can use the Game Bar overlay to take screenshots, enable or disable the microphone, and adjust recording settings to enhance your recording experience.
- If you need to pause the recording temporarily, press the Windows key + Alt + R again. To stop the recording, click on the small red recording indicator in the top-right corner of your screen, or press the Windows key + Alt + R once more. By stopping the recording, the video file will automatically be saved in the designated folder.
By following these simple steps, you can easily initiate the screen recording process on Windows 10 and capture your screen activities effortlessly.
Pausing and stopping the recording

Pausing and stopping the recording during a screen recording session on Windows 10 is essential when you need to take a break or end the recording. Here’s how you can pause and stop the recording:
- To pause the recording temporarily, press the Windows key + Alt + R again. This will pause the recording without ending it.
- When you’re ready to resume the recording, simply press the Windows key + Alt + R again. This will resume the recording from where you left off.
- If you want to stop the recording altogether, click on the small red recording indicator in the top-right corner of your screen, or press the Windows key + Alt + R once more. By stopping the recording, the video file will automatically be saved in the designated folder.
- Before ending the recording, make sure you’ve captured all the necessary content. Review your recording to ensure it meets your requirements.
- If you’re using a third-party screen recording software, the process of pausing and stopping the recording may vary. Refer to the software’s documentation or settings for instructions specific to that software.
Remember, it’s important to pause or stop the recording whenever needed to avoid recording unnecessary content, save storage space, and make the editing process easier. Pausing the recording allows you to take breaks without having to start a new recording session. And stopping the recording finalizes the video file and saves it for future use or editing.
With these simple steps, you can seamlessly pause and stop your screen recordings on Windows 10 whenever necessary.
Editing and Saving Your Recording
Once you have finished recording your screen on Windows 10, it’s time to edit and save your recording. Editing allows you to refine the content and make it more visually appealing, while saving ensures that your recording is stored for future use. Here are the steps to editing and saving your recording:
- Basic video editing techniques: To enhance your recording, consider using video editing software such as Adobe Premiere Pro, Camtasia, or OpenShot. These tools provide features like trimming, cropping, adding text or captions, adjusting audio levels, and applying visual effects. By editing your recording, you can remove any unnecessary content, add transitions between scenes, and make sure that the important parts of your video are highlighted.
- Saving and exporting your recording: After editing, you need to save your recording in a suitable format. Most video editing software allows you to choose the file format and quality settings for your recording. The commonly used formats for sharing videos are MP4, MOV, and AVI. Be sure to save a copy of your recording in a high-quality format for archiving purposes.
- Consider compressing your video: If the file size of your recording is too large, you may want to compress it without sacrificing too much quality. There are various compression tools available, such as HandBrake and Adobe Media Encoder, which can help reduce the file size while maintaining decent video quality.
- Saving your recording securely: It’s important to save your recording in a secure location to prevent accidental loss or unauthorized access. Consider creating a dedicated folder on your computer or external storage device for all your screen recordings. Additionally, you may want to back up your recordings to cloud storage or an external hard drive regularly.
By following these steps, you can edit and save your screen recordings on Windows 10 effectively. Remember to choose the right editing software, save your recordings in a suitable format, and keep them securely stored for future use.
Basic video editing techniques
When it comes to editing your screen recording on Windows 10, there are several basic video editing techniques that you can use to enhance the quality and visual appeal of your content. Here are some techniques that you can try:
- Trimming: Trim the beginning and end of your recording to remove any unnecessary footage or awkward pauses. This helps to keep your video concise and engaging.
- Cropping: If there are specific areas of your screen recording that you want to emphasize, you can crop the video to zoom in on those sections. This can help to bring attention to important details or actions.
- Adding text or captions: Adding text or captions to your screen recording can provide additional context or explanations for viewers. You can use text overlays to highlight key points, provide instructions, or label certain elements on the screen.
- Adjusting audio levels: Sometimes the audio in your screen recording may be too loud or too soft. You can adjust the audio levels to ensure that the sound is clear and balanced. This can involve increasing or decreasing the volume, as well as removing any background noise.
- Applying visual effects: Visual effects can enhance the overall look of your screen recording. You can add transitions between scenes, apply filters or color corrections, and even insert overlays or animations to make your video more visually appealing.
By applying these basic video editing techniques, you can refine your screen recording and create a more polished final product. Experiment with different editing tools and features to find the ones that work best for your content. Remember, practice makes perfect, so don’t be afraid to try new techniques and get creative with your editing.
Saving and exporting your recording
Saving and exporting your recording is the final step in the screen recording process. Once you have finished recording your screen on Windows 10, you need to save and export the video file so that you can easily access and share it. Here’s how you can do it:
- Saving your recording: After you have stopped the screen recording, you will be prompted to save the video file. Choose a location on your computer where you want to save the recording. By default, Windows 10 saves the recordings in your user folder under VideosCaptures. However, you can change the location if you prefer.
- Exporting your recording: Once the recording is saved, you may want to export it in a specific format or compress it to reduce file size. To do this, you can use video editing software or any online converter tool. There are various options available, such as MP4, AVI, WMV, and more. Choose the format that suits your needs and follow the instructions to export the recording.
- Naming and organizing your recording: Before you finalize the saving and exporting process, make sure to give your recording a descriptive and meaningful name. This will help you easily identify the content and locate the file in the future. Additionally, consider organizing your recordings into specific folders based on the topic or date, to keep your files well-structured and easily accessible.
Remember to always check the quality and file size of your exported recording to ensure it meets your requirements. It is also a good practice to keep backup copies of your recordings in a separate location or cloud storage for added security. With these steps, you can effectively save and export your screen recordings on Windows 10 and share them with others or use them for future reference.
Conclusion
Congratulations! You have now learned how to successfully record your screen on Windows 10. Screen recording has undoubtedly become an essential skill in the digital age, allowing you to capture and share important moments, create tutorials, stream gaming sessions, and record webinars. With the step-by-step guide provided, you can easily navigate the screen recording process and unleash your creativity.
By following the outlined steps, you can ensure a smooth and efficient recording experience. Before you begin, take the time to check your system requirements and select a reliable screen recording software. This will guarantee that you have the necessary tools to capture high-quality recordings.
Once you have set up your recording, don’t forget to adjust the settings and choose the specific area you wish to record. This will help focus on the relevant content and eliminate any distractions.
During the recording process, remember to keep track of time and use the pause and stop features as needed. This will allow you to capture multiple segments or take breaks without interrupting the flow of your recording.
After recording, you can enhance your videos by applying basic editing techniques. Trim and cut unnecessary sections, add annotations or captions, and include transitions to create a polished final product.
Finally, remember to save and export your recording in a format of your choice. Take the time to organize your files and give them meaningful names for easy access in the future. Consider using external storage or cloud services to back up your recordings for added security.
Now that you have mastered the art of screen recording on Windows 10, you can confidently share your videos, educate others, and showcase your skills. Explore further resources and tips to enhance your screen recording capabilities, and continue to refine your techniques to create captivating and informative content. Capture your screen, unleash your creativity, and make your mark in the digital world!
Tips for efficient screen recording on Windows 10
When it comes to screen recording on Windows 10, efficiency is key. To ensure that your recording process goes smoothly and you capture high-quality videos, here are some valuable tips:
- Optimize your settings: Before you start recording, make sure to optimize your system settings. Close unnecessary applications and processes to free up system resources and prevent any lag or interruptions during recording.
- Use a stable internet connection: If you plan to livestream or upload your recordings online, a stable internet connection is essential. Connect to a reliable network to prevent any disruptions or buffering issues.
- Choose the right recording software: Select a screen recording software that meets your specific needs. Look for features such as customizable recording options, editing tools, and the ability to capture audio from multiple sources.
- Plan your recording in advance: Before hitting the record button, plan out what you want to capture on your screen. This will help you stay focused and minimize unnecessary recording time. Prepare any scripts or notes in advance to keep your recording concise and organized.
- Use keyboard shortcuts: Familiarize yourself with the keyboard shortcuts for your chosen screen recording software. This will help you navigate the recording process more efficiently and save valuable time.
- Keep your files organized: Create a dedicated folder for your screen recordings and give each file a meaningful name. This will make it easier to locate and access your recordings later on.
- Consider using an external microphone: If you need to record audio along with your screen, consider using an external microphone for better sound quality. This will enhance the overall experience for viewers and ensure clear audio in your recordings.
By following these tips, you can optimize your screen recording workflow on Windows 10 and create professional-looking videos with ease. Experiment with different techniques and explore additional resources to continue improving your recording skills.
Next steps and further resources
After successfully recording your screen on Windows 10, you might be wondering what to do next. Here are some next steps and further resources to help you make the most of your screen recording experience:
- Edit your recording: Once you have finished recording, you can enhance your video by editing it. Trim unnecessary parts, add captions or annotations, and enhance the overall visual appeal with video editing software like Adobe Premiere Pro or Camtasia.
- Share your recording: Whether it’s for educational purposes or to showcase your work, sharing your screen recording is a great way to engage with your audience. You can upload your video to platforms like YouTube, Vimeo, or social media platforms such as Facebook or Instagram.
- Explore advanced features: If you want to take your screen recording skills to the next level, consider exploring advanced features. This includes adding transitions, using green screen effects, or experimenting with picture-in-picture overlays. Take time to explore the capabilities of your chosen screen recording software to unlock its full potential.
- Learn more about screen recording: If you want to dive deeper into the world of screen recording, there are plenty of resources available to expand your knowledge. Online tutorials, forums, and video courses can provide valuable insights and tips for mastering the art of screen recording.
- Stay updated: Keep an eye out for updates and new features in screen recording software. Developers are continuously improving their tools, so staying updated will ensure you have access to the latest advancements and optimizations.
By following these next steps and exploring further resources, you can continue to improve your screen recording skills and create captivating videos on Windows 10. So, get ready to unleash your creativity and make your screen recordings truly exceptional!


