How to Change Default Font in Word [100%]
Introduction
Welcome to our guide on how to change the default font in Word! Whether you use Microsoft Word for work, school, or personal projects, having the ability to customize the default font can greatly enhance your document creation experience. In this article, we will provide you with step-by-step instructions for changing the default font and customizing its style and size.
The default font in Word is the font that is automatically applied to all new documents. It is set by Microsoft as a standard font, but you may have your own preferences or requirements for different projects. By changing the default font, you can save time and ensure consistency in your document formatting.
There are various reasons why you might want to change the default font. Perhaps you prefer a specific font style or size that better suits your needs. Maybe you want to align your documents with a company or brand-specific font. Whatever the reason may be, knowing how to customize the default font will give you greater control over the appearance of your documents.
In the following sections, we will walk you through changing the default font for new and existing documents. We will also provide troubleshooting tips and address common issues that may arise when making these changes. So let’s get started and learn how to make Word truly reflect your personal style!
Overview of default font in Word
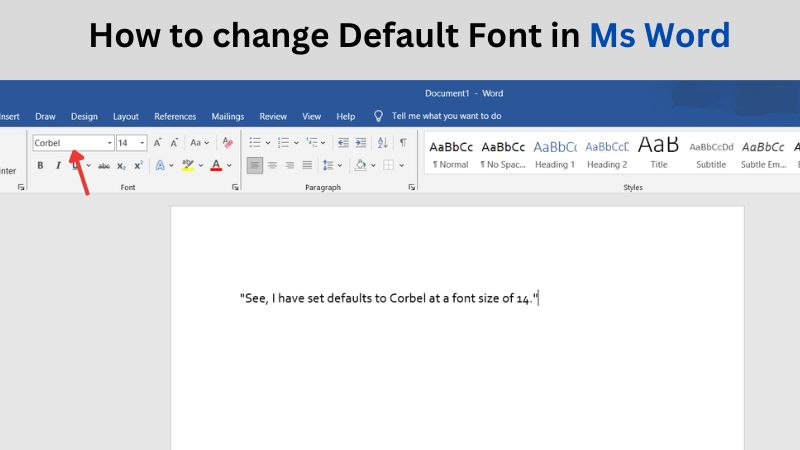
In Microsoft Word, the default font is the font that is automatically applied to all new documents. It serves as the foundation for the appearance of your text, dictating the style and size of the characters you type. The default font is set by Microsoft as a standard font, but you have the option to customize it to better suit your preferences or project requirements.
The default font in Word is typically set to Calibri, with a size of 11 points. However, this can vary depending on your version of Word or any previous customizations you may have made. Changing the default font allows you to establish a personalized starting point for all your documents, ensuring consistency and saving time in formatting.
When considering the default font, it’s important to choose one that aligns with your desired aesthetic, readability, and branding guidelines. You might prefer a classic and professional font like Times New Roman or opt for a more modern and sleek look with Arial. Additionally, selecting an appropriate font size can play a significant role in enhancing readability and accessibility.
By customizing the default font in Word, you can create a cohesive and unified appearance across all your documents. Whether you’re working on academic papers, business reports, or creative projects, having control over the default font allows you to express your unique style while maintaining professionalism and clarity.
Reasons to change default font

Changing the default font in Word offers several benefits and reasons to consider making this adjustment. Here are some compelling reasons to change the default font:
- Personal preference: The default font may not align with your personal taste or style. By changing the default font, you can ensure that every document you create reflects your individuality and enhances your writing experience.
- Branding consistency: If you are creating documents for a company or organization, you may want to use a specific font that aligns with their branding guidelines. Changing the default font allows you to maintain consistent branding across all documents, presenting a professional and cohesive image.
- Readability and accessibility: Certain fonts are easier to read than others, especially for people with visual impairments or reading difficulties. Changing the default font to a more legible option can enhance document accessibility and ensure that your content is accessible to a wider range of readers.
- Project requirements: Different projects may have specific font requirements based on industry standards or guidelines. For instance, academic papers often require fonts like Times New Roman or Arial. By changing the default font, you can save time by automatically applying the appropriate font for each project.
- Previous customizations: If you have already customized the font settings for previous documents and want these settings to be applied automatically to new documents, changing the default font is necessary.
By considering these reasons, you can make an informed decision about changing the default font in Word and create documents that are visually appealing, on brand, and easy to read for yourself and your intended audience.
Changing Default Font in Word
When it comes to customizing your Word documents, one of the most noticeable changes you can make is to the default font. Changing the default font allows you to personalize your documents and make them more visually appealing. Here’s a step-by-step guide on how to change the default font in Word.
- Open Microsoft Word and navigate to the “Home” tab.
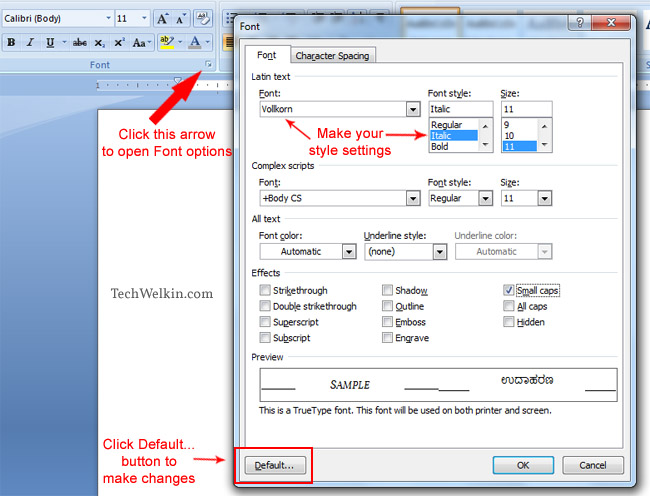
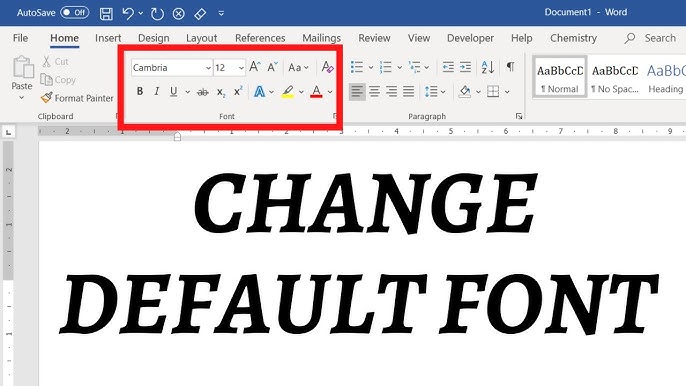
- Look for the “Font” group and click on the small arrow at the bottom right corner of the group.
- This will open the Font dialog box. Here, you can choose your desired font style and size from the available options.
- Once you have selected your preferred font, click on the “Set As Default” button located at the bottom left of the dialog box.
- A new dialog box will appear, giving you the option to apply the changes to either “This document only” or “All documents based on the Normal template.” Choose the appropriate option based on your needs.
- Click “OK” twice to save your changes.
It’s important to note that changing the default font is specific to each computer you use, so if you work on multiple devices, you will need to repeat these steps on each one.
By following these simple steps, you can easily change the default font in Word and give your documents a unique look and feel. Experiment with different fonts until you find one that best represents your personal style or aligns with your company’s branding guidelines. Don’t be afraid to get creative and make your documents stand out!
Step-by-step guide to changing default font

Are you tired of using the same old default font in your Microsoft Word documents? Don’t worry, because changing the default font is easier than you think! Follow this step-by-step guide to give your documents a fresh new look:
- Open Microsoft Word and go to the “Home” tab.
- Look for the “Font” group and click on the small arrow at the bottom right corner of the group. This will open the Font dialog box.
- In the Font dialog box, you can choose your desired font style and size from the available options. Take a moment to preview different fonts and find one that suits your preferences.
- Once you have selected your preferred font, click on the “Set As Default” button located at the bottom left of the dialog box.
- A new dialog box will appear, giving you the option to apply the changes to either “This document only” or “All documents based on the Normal template.” Choose the appropriate option based on your needs. If you want to change the default font for all new documents, select the latter option.
- Click “OK” twice to save your changes.
Congratulations! You have successfully changed the default font in Word. Now every new document you create will automatically use your chosen font as default.
Remember that changing the default font is specific to each computer you use, so if you work on multiple devices, you will need to repeat these steps on each one.
With these simple steps, you can customize your Word documents and make them more visually appealing. Experiment with different fonts until you find one that best represents your personal style or aligns with your company’s branding guidelines. Happy writing!
fairest experience when changing default font
Customizing font style and size

When it comes to customizing the font style and size in Microsoft Word, you have endless possibilities to make your documents stand out. By personalizing the font, you can add a touch of uniqueness and creativity to your work. Here’s how you can customize the font style and size in Word:
- Select the text: Before customizing the font, highlight the text that you want to modify. You can do this by simply clicking and dragging your cursor over the desired text.
- Access the Font dialog box: Once the text is selected, go to the “Home” tab and locate the “Font” group. Click on the small arrow at the bottom right corner of the group to open the Font dialog box.
- Choose your font style: In the Font dialog box, you will see a variety of font styles to choose from. Scroll through the options and select the one that suits your preference. If you have a specific font in mind, you can type its name directly into the “Font” field.
- Adjust the font size: Right below the “Font” field, you will find a drop-down menu labeled “Size”. Click on it and choose your desired font size from the available options. Alternatively, you can manually input a specific size in the field next to the drop-down menu.
- Apply changes: Once you have selected your preferred font style and size, click on the “OK” button to apply the changes to your selected text.
By customizing your font style and size in Word, you can elevate the visual appeal of your documents and make them more engaging for your readers. Experiment with different combinations until you find the perfect look that complements your content and represents your personal or professional style.
Changing Default Font for New Documents
By default, Microsoft Word uses a predetermined font for all new documents. However, you have the option to change this default font to suit your preferences. Changing the default font for new documents allows you to have a consistent and personalized look whenever you create a new file. Here’s how you can change the default font for new documents:
- Open Microsoft Word on your computer.
- Go to the “Home” tab at the top of the screen.
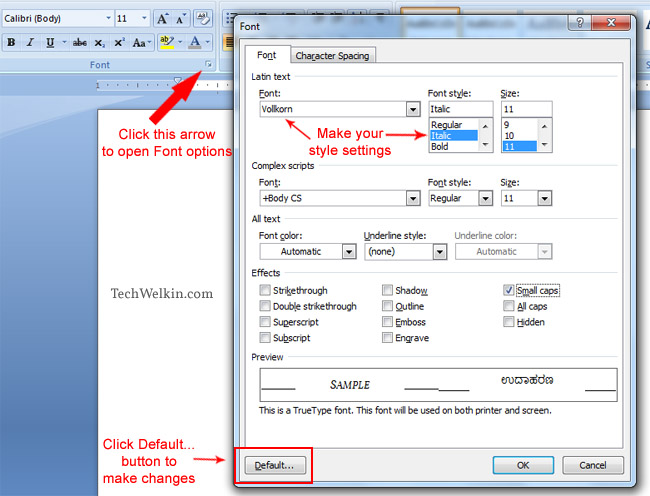
- In the “Font” group, click on the small arrow in the bottom right corner. This will open the Font dialog box.
- Choose the font style and size that you want to set as the default for new documents.
- Once you have selected your desired font, click on the “Set As Default” button located at the bottom left of the dialog box.
- A prompt will appear asking whether you want to set the default font for just this document or for all documents based on the Normal template. Select your preferred option.
- Click “OK” twice to apply the changes.
The next time you open a new document in Microsoft Word, it will automatically use your chosen default font. Keep in mind that changing the default font only affects new documents, not existing ones. If you want to change the font for an existing document, refer to the next section. Customizing the default font for new documents allows you to streamline your workflow and maintain consistency in your branding or formatting choices across different files.
Setting default font for new documents

When creating new documents in Microsoft Word, it can be helpful to set a default font that suits your preferences. By doing so, you can save time by not having to manually change the font every time you start a new document. Here’s how you can set the default font for new documents:
- Open Microsoft Word on your computer.
- Go to the “Home” tab at the top of the screen.
- In the “Font” group, click on the small arrow in the bottom right corner. This will open the Font dialog box.
- Choose the font style and size that you want to set as the default for new documents.
- Once you have selected your desired font, click on the “Set As Default” button located at the bottom left of the dialog box.
- A prompt will appear asking whether you want to set the default font for just this document or for all documents based on the Normal template. Select the option to apply it to all documents based on the Normal template.
- Click “OK” twice to save the changes.
Now, whenever you create a new document in Microsoft Word, it will automatically use your chosen default font until you decide to change it again. This is especially convenient if you frequently use a specific font for your personal or professional documents. Customizing the default font for new documents is a simple way to ensure consistency and streamline your workflow in Microsoft Word.
Saving changes for future use
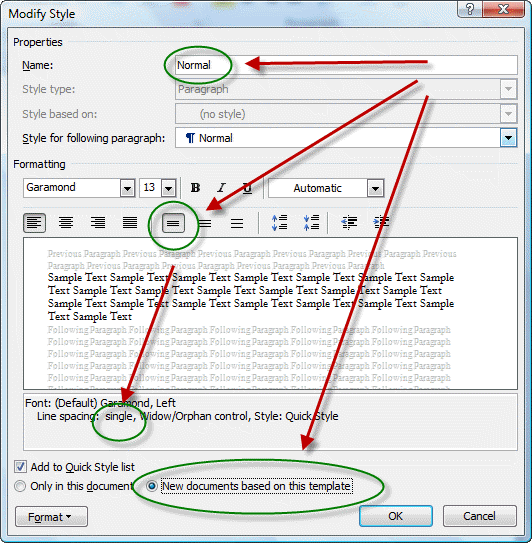
Once you have successfully changed the default font in Microsoft Word, it’s important to save these changes for future use. This way, every new document you create will automatically use your preferred font without any additional steps. Saving the changes ensures consistency and saves you time in the long run.
To save the changes made to the default font:
- Open Microsoft Word on your computer.
- Go to the “Home” tab at the top of the screen.
- In the “Font” group, click on the small arrow in the bottom right corner. This will open the Font dialog box.
- Choose the font style and size that you want to set as the default for new documents.
- Once you have selected your desired font, click on the “Set As Default” button located at the bottom left of the dialog box.
- A prompt will appear asking whether you want to set the default font for just this document or for all documents based on the Normal template. Select the option to apply it to all documents based on the Normal template.
- Click “OK” twice to save the changes.
By following these simple steps, you have successfully saved your preferred default font for future use in Microsoft Word. From now on, whenever you create a new document, your chosen font will automatically be applied. This eliminates the need to manually change the font each time you start a new project.
Remember that if you ever want to revert back to Word’s default font settings, you can follow similar steps and choose the “Reset Default” button in the Font dialog box.
Saving your changes ensures consistency in your document formatting and helps streamline your workflow when using Microsoft Word. Now you can enjoy creating content with your preferred default font hassle-free!
Changing Default Font for Existing Documents

If you have existing documents in Microsoft Word that use the default font and you want to change it, don’t worry! It’s possible to modify the font for these documents without having to manually update each one. Follow these steps to change the default font for existing documents:
- Open Microsoft Word on your computer.
- Go to the “Home” tab at the top of the screen.
- In the “Font” group, click on the small arrow located at the bottom right corner. This will open the Font dialog box.
- Choose the desired font style and size that you want to apply to your existing documents.
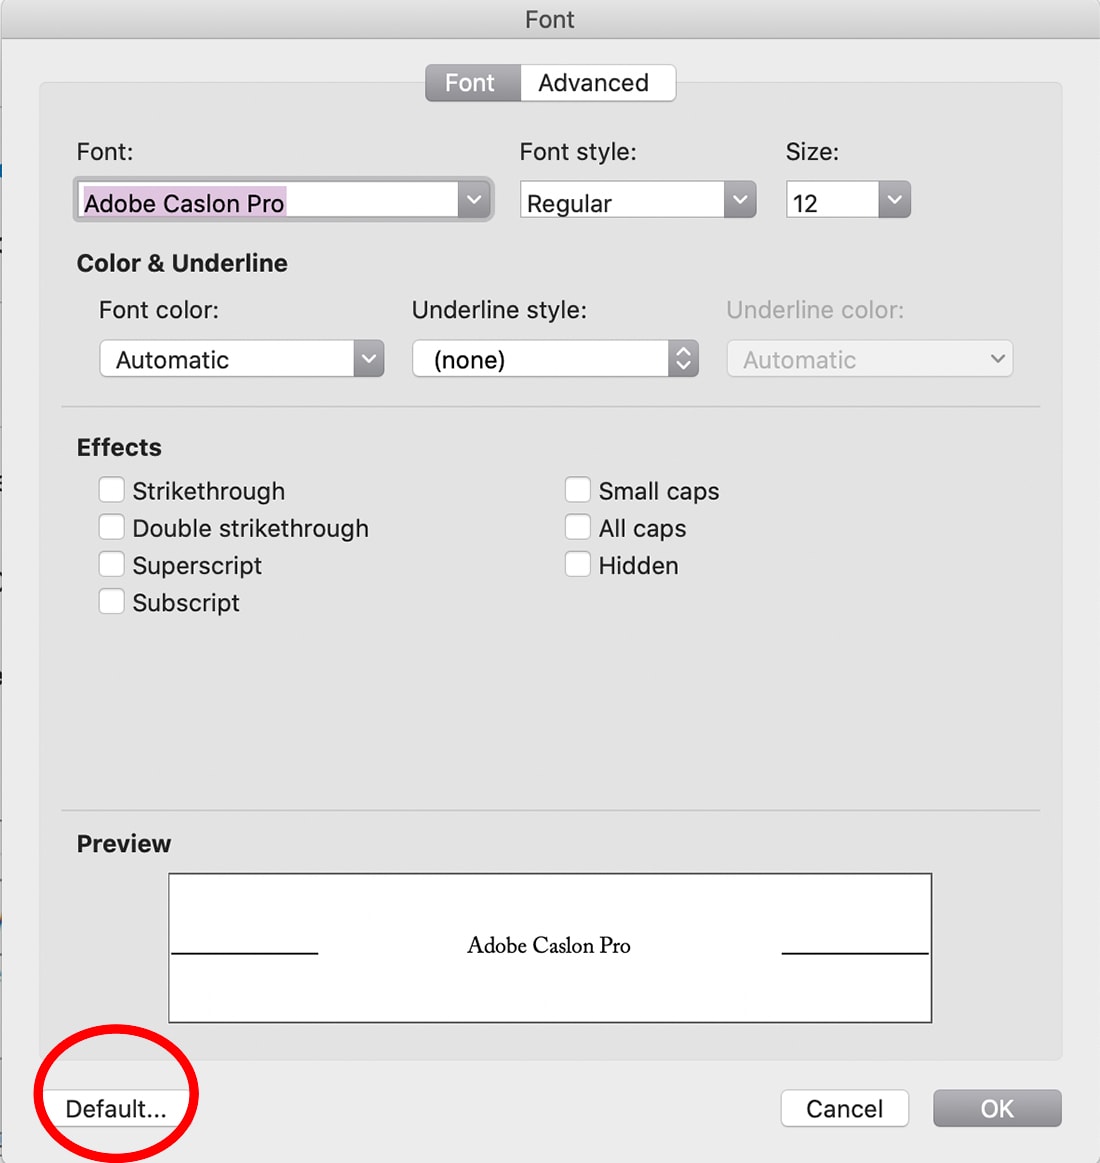
- Click on the “Default…” button at the bottom left of the dialog box.
- A prompt will appear asking if you want to change the default font for all new documents based on the Normal template or just for this document. Select the option to apply it to all new documents based on the Normal template.
- Click “OK” twice to save your changes.
Once you have completed these steps, the default font for your existing documents will be updated accordingly. The next time you open any of those documents, they will automatically display the new default font. This feature saves you time and ensures consistency throughout your files.
It’s important to note that changing the default font for existing documents doesn’t alter any text formatting or styles previously applied within those documents. Only the default font will be affected.
By following these simple steps, you can easily change the default font for your existing Microsoft Word documents and maintain a consistent look and feel across all your files.
Changing font for existing documents

If you have existing documents in Microsoft Word that use the default font and you want to change it, don’t worry! It’s possible to modify the font for these documents without having to manually update each one.
To change the font for existing documents, follow these steps:
- Open Microsoft Word on your computer.
- Go to the “Home” tab at the top of the screen.
- In the “Font” group, click on the small arrow located at the bottom right corner. This will open the Font dialog box.
- Choose the desired font style and size that you want to apply to your existing documents.
- Click on the “Default…” button at the bottom left of the dialog box.
A prompt will appear asking if you want to change the default font for all new documents based on the Normal template or just for this document. Select the option to apply it to all new documents based on the Normal template.
Click “OK” twice to save your changes.
Once you have completed these steps, the default font for your existing documents will be updated accordingly. The next time you open any of those documents, they will automatically display the new default font.
It’s important to note that changing the default font for existing documents doesn’t alter any text formatting or styles previously applied within those documents. Only the default font will be affected.
By following these simple steps, you can easily change the default font for your existing Microsoft Word documents and maintain a consistent look and feel across all your files.
Ensuring consistency in formatting

Ensuring consistency in formatting is crucial when it comes to creating professional and cohesive documents. By following a few guidelines, you can ensure that all your documents maintain the same font style and size.
Firstly, it is important to establish a standard font for all your documents. This can be easily done by changing the default font in Microsoft Word, as mentioned earlier in this article. By setting a default font, every new document you create will automatically use that font.
Additionally, it is essential to apply consistent formatting throughout your document. This includes headings, subheadings, body text, and any other elements such as bullet points or numbered lists. Stick to the same font style and size for all these elements to create a visually appealing and organized document.
You can also utilize features like styles and templates in Word to ensure consistency. Styles allow you to apply pre-defined formatting to different elements of your document, making it easier to maintain a consistent look. Templates provide a starting point with pre-set formatting options, saving you time and effort.
Lastly, proofread your documents after making any font changes or formatting adjustments. This will help identify any inconsistencies or errors in the visual presentation of your content. Adjust as necessary to achieve a polished and professional-looking document.
By maintaining consistency in font styles and sizes across all your documents, you can enhance readability and create a cohesive brand image. Consistent formatting not only improves the visual appeal of your documents but also makes them more professional and easier to read for your audience.
Troubleshooting and Tips

If you encounter any issues or difficulties when changing the default font in Word, don’t worry! Here are some common troubleshooting tips to help you out:
- Font not appearing correctly: If the font you selected is not displaying properly, make sure that it is installed on your computer. If it is not installed, you may need to find and install the font before using it in Word.
- Default font reverting back: If you have changed the default font but it keeps reverting back to the original font, ensure that you have saved the changes correctly. It’s important to select “All documents based on the Normal template” when setting the default font. If the issue persists, try restarting Word or even your computer.
- Compatibility issues: When sharing documents with others, there may be compatibility issues if they do not have the same font installed on their computers. To avoid this, consider using commonly available fonts or converting the text to a different format like PDF.
- Consider accessibility: When choosing a default font, keep in mind that it should be easy to read for all users, including those with visual impairments. Stick to clear and legible fonts to ensure accessibility.
- Regularly review and update: As technology evolves, new fonts become available and trends change. Periodically review your default font choice and update it as needed to stay current and maintain a modern look in your documents.
By following these tips, you can troubleshoot any issues you encounter during the process of changing the default font in Word and ensure a smooth experience.
Common issues when changing default font

When changing the default font in Word, you may encounter some common issues that can hinder the process. Here are a few of them and how to resolve them:
- Font not appearing correctly: One issue you might face is the selected font not displaying properly. This can happen if the font is not installed on your computer. Make sure to check if the desired font is installed, and if not, download and install it before using it in Word.
- Default font reverting back: Another issue could be that even after changing the default font, it keeps reverting back to the original font. To fix this, ensure that you have saved the changes correctly by selecting “All documents based on the Normal template” when setting the default font. If the issue persists, try restarting Word or your computer.
- Compatibility issues: When sharing documents with others, it’s important to consider compatibility. If recipients don’t have the same font installed on their computers, it can lead to formatting problems. To avoid this, choose commonly available fonts or convert the text to a different format like PDF.
- Consider accessibility: It’s crucial to keep accessibility in mind when choosing a default font. Select a clear and legible font that is easy to read for all users, including those with visual impairments. This ensures inclusivity and enhances readability.
- Regularly review and update: Fonts evolve over time, and new options become available. Periodically review your default font choice and update it as needed to keep up with modern design standards and maintain a fresh look in your documents.
By being aware of these common issues and following the troubleshooting tips mentioned earlier, you can overcome any challenges when changing the default font in Word.
Tips for a seamless font change experience

When changing the default font in Word, there are a few tips that can help you have a seamless experience. Follow these tips to ensure a smooth transition:
- Plan ahead: Before changing the default font, think about the fonts you want to use and their compatibility with different devices and operating systems. It’s best to choose commonly available fonts to avoid any formatting issues when sharing documents.
- Test before finalizing: Before making any changes to the default font, test your selected font on a few paragraphs or a sample document. Ensure that it appears correctly and is easily readable on different screens.
- Consider hierarchy and readability: When selecting a new default font, consider its readability at various sizes and its ability to create clear distinction between headings, subheadings, and body text. A well-designed font should have clear hierarchy and make your documents more visually appealing.
- Save a backup of the original font settings: If you are unsure about the changes you made or want to revert back to the original settings, make sure to save a backup of the original font settings for future reference.
- Update templates and styles: Changing the default font may affect existing templates and styles. After making the changes, review your templates and styles to ensure consistency throughout your documents. Update them if necessary to align with the new default font.
- Regularly monitor and adjust: Keep an eye on how your documents look with the new default font. If you notice any issues or inconsistencies, make adjustments as needed to improve their appearance.
By following these tips, you can change the default font in Word smoothly and without any major disruptions to your documents.
Conclusion
In conclusion, changing the default font in Microsoft Word can greatly enhance your document creation process. By customizing the font style and size to your preference, you can create professional-looking documents that align with your personal or brand aesthetic.
The step-by-step guide provided above offers a straightforward approach to changing the default font in Word. Whether you are using Word online, on a Mac, or the latest version of Word, you can easily modify the default font settings according to your needs.
Not only does changing the default font improve the visual appeal of your documents, but it also contributes to better readability. By selecting a font that is easy on the eyes and has good hierarchy, you can ensure that your text is clear and legible for readers.
Remember to consider compatibility and functionality when choosing a new default font. Opt for commonly available fonts that will display consistently across different devices and operating systems.
Additionally, make sure to save backups of the original font settings in case you want to revert back or make adjustments in the future. Regularly monitor how your documents appear with the new default font and make any necessary adjustments to refine their appearance.
Overall, understanding how to change the default font in Word empowers you to personalize your documents and present information in a visually appealing way. Enjoy experimenting with different fonts and unleash your creativity in document creation!
Benefits of changing default font

Changing the default font in Microsoft Word offers several benefits that can greatly enhance your document creation process. By customizing the font style and size to your preference, you can create documents that are visually appealing and align with your personal or brand aesthetic.
One major benefit of changing the default font is improved readability. Different fonts have varying levels of legibility, and selecting a font that is easy on the eyes can make a significant difference in how your text is perceived and understood by readers. Whether you choose a clean, modern font or a classic, elegant one, finding a font that enhances readability will make your documents more professional and accessible.
Changing the default font also allows for better consistency across your documents. When every new document uses the same default font, it ensures a cohesive look and feel throughout your work. This creates a sense of professionalism and establishes brand recognition if you use specific fonts associated with your company or organization.
Additionally, by changing the default font, you can express your creativity and individuality. Fonts have unique personalities and evoke different emotions, so selecting a font that matches the tone of your content can help convey your message effectively. Whether you want to convey professionalism, playfulness, or elegance, choosing the right default font sets the tone for your entire document.
Overall, changing the default font in Word empowers you to personalize your documents and present information in a visually appealing way. It improves readability, ensures consistency, and allows for creative expression. So go ahead and explore different fonts to find the one that best suits your style and enhances the impact of your documents.
Enhancing document aesthetics and readability

When you change the default font in Word, you have the opportunity to enhance the aesthetics and readability of your documents. By selecting a font that aligns with your personal or brand style, you can make your documents visually appealing and engaging.
Font selection plays a crucial role in document aesthetics. Different fonts convey different moods and tones. For example, a clean and modern font like Arial or Calibri can give your document a contemporary and professional look. On the other hand, a classic and elegant font like Times New Roman or Garamond can add a touch of sophistication.
Consistency in font choice also contributes to document aesthetics. By using the same font throughout your document, it creates a harmonious flow and cohesive visual experience for the reader. This consistency helps maintain professionalism and brand recognition.
Furthermore, changing the default font can greatly improve readability. Some fonts are easier to read than others due to their clarity and spacing. By selecting a legible font, such as Verdana or Helvetica, you ensure that your text is easily understandable without straining the reader’s eyes.
Remember to consider the size of the font as well. Too small of a font makes reading difficult while too large of a font may appear unprofessional. Finding the right balance between font size and readability is essential.
In conclusion, by changing the default font in Word, you can enhance the aesthetics and readability of your documents. The right font choice creates visual appeal, while consistency ensures a professional look. Additionally, prioritize legibility by selecting clear fonts and appropriate sizes. These simple adjustments can significantly improve the overall impact of your documents on readers.


